Feed Subscribe
Exception has been thrown by the target of an invocation.


How to: Create computed/custom properties for sample data in Blend/Sketchflow

by ondrejsv 14. March 2010 20:32

I blogged about sample data in Microsoft Blend/SketchFlow previously. SketchFlow is a great tool for rapidly building interactive screen prototypes. Sample data feature helps you to create plausible screen mocks quickly. I want to emphasize words interactive prototypes. Yes, user can click here and there and sees the entire “application flow”. Previously we mocked screens in HTML, had them rendered and sent this to our customers as a package full of JPEGs. Almost as a rule we had small disputes with customers who were arguing that they just cannot “grasp the application” from JPEGs. Now we can just publish a Silverlight prototype to our server and customers browse it throughout.

Hopefully I don’t need to note that logically connected screens should play together. Having double clicked a record in a datagrid on one screen and being redirected to another screen showing detailed information on this only record, data in fields should be the same (or related) to the record I clicked on the first screen. If you use sample data, it means that you should bind the first and second screen against the very same data source.

One problem I encountered is managing data derived from other fields in sample collection. Let’s say I have a customers collection with usual data like first name, last name and birth date. The first screen shows this list but I want to have only one column for customer name showing first and last name concatenated. I need them separated in my collection because the second “customer detail” screen would show them in separate text boxes. I could create a new string field and manually type in the full name but I am lazy to do such work and frankly have personal objections to do so. I prefer the way the full name field just computes itself. That way I can modify either name and full name updates automatically.

image

Double clicking on the Natasha row would bring me to the second screen with separate fields:

image

Fortunately, this task is not difficult. Your sample data collections are stored as XML files inside the SampleData folder in the XXXScreens project. For each such XML file, Blend generates a corresponding C# file with two ordinary class, one representing the collection and one the collection item (named Item):

image

public class Employees : System.ComponentModel.INotifyPropertyChanged { public event System.ComponentModel.PropertyChangedEventHandler PropertyChanged; protected virtual void OnPropertyChanged(string propertyName) { if (this.PropertyChanged != null) { this.PropertyChanged(this, new System.ComponentModel.PropertyChangedEventArgs(propertyName)); } } public Employees() { try { System.Uri resourceUri = new System.Uri("/SilverlightPrototype_Derived.Screens;component/SampleData/Employees/Employees.xaml", System.UriKind.Relative); if (System.Windows.Application.GetResourceStream(resourceUri) != null) { System.Windows.Application.LoadComponent(this, resourceUri); } } catch (System.Exception) { } } private ItemCollection _Collection = new ItemCollection(); public ItemCollection Collection { get { return this._Collection; } } } public class Item : System.ComponentModel.INotifyPropertyChanged { public event System.ComponentModel.PropertyChangedEventHandler PropertyChanged; protected virtual void OnPropertyChanged(string propertyName) { if (this.PropertyChanged != null) { this.PropertyChanged(this, new System.ComponentModel.PropertyChangedEventArgs(propertyName)); } } private string _LastName = string.Empty; public string LastName { get { return this._LastName; } set { if (this._LastName != value) { this._LastName = value; this.OnPropertyChanged("LastName"); } } } private string _FirstName = string.Empty; public string FirstName { get { return this._FirstName; } set { if (this._FirstName != value) { this._FirstName = value; this.OnPropertyChanged("FirstName"); } } } }

Pretty boring code. If only the Item class would be generated with the partial directive, we could add our own class with the FullName computed property.

Let’s start some hacking then. Close Blend, start your favorite text editor and open the file C:\Program Files\Microsoft Expression\Blend 3\Templates\en\SampleDataCode.cs. This is the template Blend uses for generating C# code from the sample data XML source file.

Change line 43 from:

public class COMPOSITE_TYPE : System.ComponentModel.INotifyPropertyChanged //CompositeTypeHeader - BEGIN

to:

public partial class COMPOSITE_TYPE : System.ComponentModel.INotifyPropertyChanged //CompositeTypeHeader - BEGIN

Now start Blend again, open your project, force Blend to regenerate the code file (by adding a new property and removing it immediately). If you open the sample data code file, you can notice that the Item class now has the partial keyword!

Add a new class, change the namespace to exactly math the one in the original code file and write your own partial class, like mine:

namespace Expression.Blend.SampleData.Employees { public partial class Item { public string FullName { get { return string.Format("{0} {1}", FirstName, LastName); } } } }

Job done! I may create a new bound column to my datagrid:


<data:DataGridTextColumn Header="Full Name" Binding="{Binding FullName}"/>

Note: Blend may not recognize your new properties, so you may need to write your bound fields in XAML yourself, not in the Blend UI.

kick it on DotNetKicks.com [digg]

Tags: ,

How to: Create a sketchy Siverlight GroupBox in Blend/SketchFlow

by ondrejsv 17. January 2010 18:17

Silverlight does not come with a groupbox control in its standard set of controls. Fortunately, it’s not so difficult to create a new one or you may grab Tim Greenfield’s Silverlight GroupBox control.

Having Tim’s control referenced, open the SketchStyles.xaml file in your screen mocks project, switch to the XAML view and at the end of the file before the final </ResourceDictionary> tag append this new style:


<Style x:Key="GroupBox-Sketch" TargetType="Groupbox:GroupBox">
<Setter Property="Background" Value="{StaticResource BaseBackground-Sketch}"/>
<Setter Property="Foreground" Value="{StaticResource BaseForeground-Sketch}"/>
<Setter Property="BorderThickness" Value="1"/>
<Setter Property="BorderBrush" Value="{StaticResource BaseBorder-Sketch}"/>
<Setter Property="Template">
<Setter.Value>
<ControlTemplate TargetType="Groupbox:GroupBox">
<Grid Background="{TemplateBinding Background}">
<Grid.RowDefinitions>
<RowDefinition Height="Auto"/>
<RowDefinition Height="*"/>
</Grid.RowDefinitions>
<SketchControls:SketchRectangleSL Grid.Row="1" Grid.RowSpan="2" BorderBrush="{TemplateBinding BorderBrush}" BorderThickness="{TemplateBinding BorderThickness}">
<SketchControls:SketchRectangleSL.Clip>
<GeometryGroup FillRule="EvenOdd">
<RectangleGeometry x:Name="FullRect" Rect="0,0,300,200"/>
<RectangleGeometry x:Name="HeaderRect" Rect="6,0,100,100"/>
</GeometryGroup>
</SketchControls:SketchRectangleSL.Clip>
</SketchControls:SketchRectangleSL>
<ContentPresenter Margin="{TemplateBinding Padding}" Grid.Row="2" Content="{TemplateBinding Content}" ContentTemplate="{TemplateBinding ContentTemplate}"/>
<ContentControl x:Name="HeaderContainer" HorizontalAlignment="Left" Margin="6,0,0,0" Grid.Row="0" Grid.RowSpan="2">
<ContentPresenter Margin="3,0,3,0" Content="{TemplateBinding Header}" ContentTemplate="{TemplateBinding HeaderTemplate}"/>
</ContentControl>
</Grid>
</ControlTemplate>
</Setter.Value>
</Setter>
<Setter Property="FontFamily" Value="{StaticResource FontFamily-Sketch}"/>
<Setter Property="FontSize" Value="{StaticResource SizeDouble-Sketch}"/>
<Setter Property="FontWeight" Value="{StaticResource FontWeight-Sketch}"/>
</Style>

At the beginning of the file add this new namespace declaration:


xmlns:Groupbox="clr-namespace:Groupbox;assembly=Groupbox"

Done! You may now create a sketchy groupbox:

image

image

kick it on DotNetKicks.com [digg]

Tags: ,

How to: Create a new format for sample data in Blend/SketchFlow

by ondrejsv 17. January 2010 14:04

Microsoft Expression SketchFlow (part of the Expression Blend Product) is a great tool for quickly creating interactive low-fidelity prototypes. One of its features is sample data. You can either import data from an XML file, type in it manually within the SketchFlow user interface or let it populate automatically from the Blend sample data collection. The last option is very effective if you are experimenting with many screen mocks.

Note: You may use sample data feature equally well in the SketchFlow as well as in the Blend itself.

Blend supports four data types in sample data: string, number, boolean and image. If you create a new string property you can tell Blend what format you want to have the property in – e.g. name, url address, e-mail or color. Blend then create a sample data based on this (in our case it may be “Jamison, Jay”, http://www.graphicdesigninstitute.com/, someone-3@adventure-works.com, #FFFFED6F).

You can also create a new format if you often create screen mocks with some specific data. For example let’s say that I often mock administration module prototypes and I would find useful to have a login name format to let Blend create sample data for me.

All sample data is stored in the C:\Program Files\Microsoft Expression\Blend 3\SampleDataResources\en\Data\SampleStrings.csv.

Tip: If you are running Blend in other language than English, you may create a subfolder with your language code (instead of the en) and it takes precedence over the en folder.

This file is nothing more that a comma separated data file. I can add a new column to the header and then new columns do data rows (new columns are last):

Name,Phone Number,Email Address,Website URL,Address,Company Name,Date,Time, Price, Colors,Login
"Aaberg, Jesper",(111) 555-0100,someone@example.com,http://www.adatum.com/,"4567 Main St., Buffalo, NY 98052",A. Datum Corporation,"November 5, 2003",8:20:14 AM,$100,#FF8DD3C7,jesper.aaberg
"Adams, Ellen",(222) 555-0101,user@adventure-works.com,http://www.adventure-works.com/,"1234 Main St., Buffalo, NY 98052",Adventure Works,"December 29, 2006",7:06:05 AM,$29.99,#FFFFFFB3,ellen.adams
"Adams, Terry",(333) 555-0102,someone@adventure-works.com,http://www.adventure-works.com/ ,"2345 Main St., Buffalo, NY 98052",Adventure Works,"January 19, 2004",4:26:00 PM,$249.99,#FFBEBADA,terry.adams

and so on. Just remember to restart Blend if you finish modifying the sample dataset.

Note: You don’t need to supply a sample value for all rows but be sure to include a comma then. Otherwise Blend won’t load the file correctly.

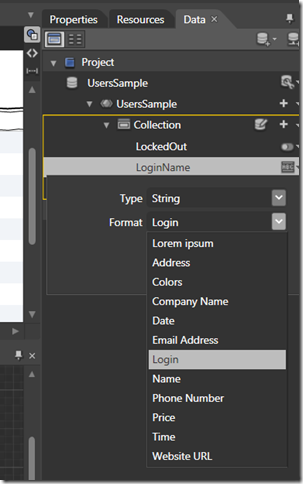
After restart I can create a new string property with my new Login format:
image

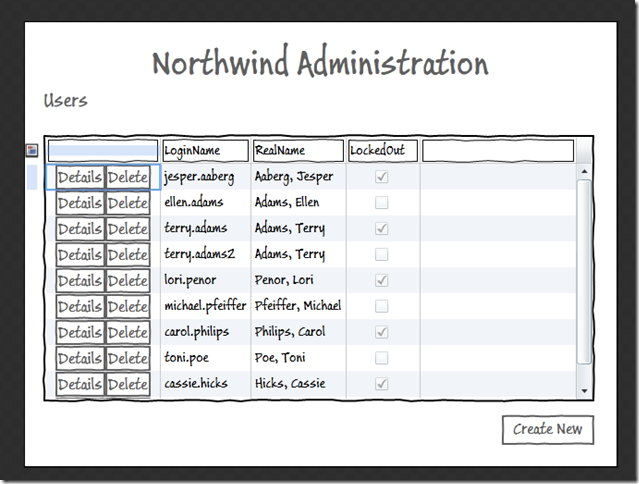
and bind it to a DataGrid or any other control:
image

Happy mocking! :-)

kick it on DotNetKicks.com [digg]

Tags: ,