[UPDATE 2010-08-28: I updated the sample to work with the final release of Silverlight 4. I also improved the design a little :-)]
Today I want to share with you my Audio Record sample using some new cool features coming in Silverlight 4. The sample demonstrates:
- recording audio using the AudioCaptureDevice and CaptureSource classes, and saving it using an AudioSink object,
- access to local folders on the computer,
- simple commanding model using the new Command properties and ICommand interface,
- changing appearance of a standard control (button) using its visual states.
Of course, full source code is attached at the end of the article.
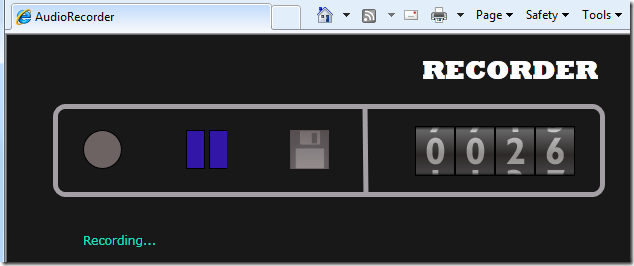
The user interface is really simple:

What we want to achieve:
- three state audio recorder with three buttons “Record”, “Stop” and “Save”,
- the user first selects the “Record” buttons, the recorder will begin recording; the user clicks the “Stop” button when he is done with recording and finally selects the “Save” button to be prompted by a classic Save file dialog to save the record into a standard WAV file on his disc,
- command buttons should have a correct enabled/disabled logic,
- a status bar with text helping the user what to do or what is the recorder doing,
Disclaimer: Obviously I’m not the one gifted with graphical skills so don’t expect nifty animations here and there. It’s just a sample. :-)
Recording audio
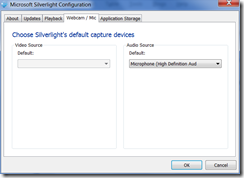
An AudioCaptureDevice object represents a hardware device cable capturing sound. There may be more than one present and the user may select a default one in the new Silverlight 4 configuration tab:

You can get the default one through the CaptureDeviceConfiguration class:
var audioDevice = CaptureDeviceConfiguration.GetDefaultAudioCaptureDevice();
Then you use a CaptureSource object to capture any input from this source:
_captureSource = new CaptureSource() { AudioCaptureDevice = audioDevice };
Lastly, we need to connect a sink to the capture source. Sinks allow us to process incoming input from the source in any way we want – for example to store in a memory stream. For this we derive a new AudioSink (our is called MemoryAudioSink) and override the most important method – OnSamples:
protected override void OnSamples(long sampleTime, long sampleDuration, byte[] sampleData)
{
    // New audio data arrived, write them to the stream.
    _stream.Write(sampleData, 0, sampleData.Length);
}
To connect and start capturing the sound:
_sink = new MemoryAudioSink();
_sink.CaptureSource = _captureSource;
_captureSource.Start()
Writing a WAV file
CaptureSource sends the captured sound to its sinks as raw PCM data. We need to add a standard WAV header to be usable for a user. This is done by the SavePcmToWav method:
public static void SavePcmToWav(Stream rawData, Stream output, AudioFormat audioFormat)
{
    if (audioFormat.WaveFormat != WaveFormatType.Pcm)
        throw new ArgumentException("Only PCM coding is supported.");

    BinaryWriter bwOutput = new BinaryWriter(output);

    // Write down the WAV header.
    // Refer to http://technology.niagarac.on.ca/courses/ctec1631/WavFileFormat.html
    // for details on the format.

    // Note that we use ToCharArray() when writing fixed strings
    // to force using the char[] overload because
    // Write(string) writes the string prefixed by its length.

    // -- RIFF chunk

    bwOutput.Write("RIFF".ToCharArray());

    // Total Length Of Package To Follow
    // Computed as data length plus the header length without the data
    // we have written so far and this data (44 - 4 ("RIFF") - 4 (this data))
    bwOutput.Write((uint)(rawData.Length + 36));

    bwOutput.Write("WAVE".ToCharArray());

    // -- FORMAT chunk

    bwOutput.Write("fmt ".ToCharArray());

    // Length Of FORMAT Chunk (Binary, always 0x10)
    bwOutput.Write((uint)0x10);

    // Always 0x01
    bwOutput.Write((ushort)0x01);

    // Channel Numbers (Always 0x01=Mono, 0x02=Stereo)
    bwOutput.Write((ushort)audioFormat.Channels);

    // Sample Rate (Binary, in Hz)
    bwOutput.Write((uint)audioFormat.SamplesPerSecond);

    // Bytes Per Second
    bwOutput.Write((uint)(audioFormat.BitsPerSample * audioFormat.SamplesPerSecond * audioFormat.Channels / 8));

    // Bytes Per Sample: 1=8 bit Mono, 2=8 bit Stereo or 16 bit Mono, 4=16 bit Stereo
    bwOutput.Write((ushort)(audioFormat.BitsPerSample * audioFormat.Channels / 8));

    // Bits Per Sample
    bwOutput.Write((ushort)audioFormat.BitsPerSample);

    // -- DATA chunk

    bwOutput.Write("data".ToCharArray());

    // Length Of Data To Follow
    bwOutput.Write((uint)rawData.Length);

    // Raw PCM data follows...

    // Reset position in rawData and remember its origin position
    // to restore at the end.
    long originalRawDataStreamPosition = rawData.Position;
    rawData.Seek(0, SeekOrigin.Begin);

    // Append all data from rawData stream into output stream.
    byte[] buffer = new byte[4096];
    int read;       // number of bytes read in one iteration
    while ((read = rawData.Read(buffer, 0, 4096)) > 0)
    {
        bwOutput.Write(buffer, 0, read);
    }

    rawData.Seek(originalRawDataStreamPosition, SeekOrigin.Begin);
}
Simple commanding with a simple view model
I’m a fan of the new Model-View-ViewModel pattern as it allows you further properly structure your presentation layer while taking advantage of powerful WPF/Silverlight databinding. It wasn’t so simple to use it in Silverlight projects because it did not support commands as the full WPF stack did so you needed to resort to Prism or other frameworks.
However, with Silverlight 4 comes the ICommand interface:
    public interface ICommand
    {
        event EventHandler CanExecuteChanged;
        bool CanExecute(object parameter);
        void Execute(object parameter);
    }
and new Command properties on ButtonBase-derived controls and the HyperLink control.
With this you can create your own viewmodel wrapping all your code interacting with the user interface and application logic in a single unit-testable class. The user interface will hook into your viewmodel class though public ICommand and dependency properties by leveraging databinding. Your code-behind will be almost empty!
To simplify things I created a SimpleCommand because all of my commands will just call a method on the viewmodel class and I will set their executability directly through a property:
public class SimpleCommand : ICommand
{
    public Action ExecuteAction { get; set; }

    private bool _canExecute;
    public bool MayBeExecuted
    {
        get { return _canExecute; }
        set
        {
            if (_canExecute != value)
            {
                _canExecute = value;
                if (CanExecuteChanged != null)
                    CanExecuteChanged(this, new EventArgs());
            }
        }
    }

    #region ICommand Members

    public bool CanExecute(object parameter)
    {
        return MayBeExecuted;
    }

    public event EventHandler CanExecuteChanged;

    public void Execute(object parameter)
    {
        if (ExecuteAction != null)
            ExecuteAction();
    }

    #endregion
}
Let’s dig into the viewmodel class – the heart of the application. First some declarations:
public class RecorderViewModel : DependencyObject
{
    private SimpleCommand _recordCommand;
    private SimpleCommand _playPauseCommand;
    private SimpleCommand _saveCommand;

    private MemoryAudioSink _sink;
    private CaptureSource _captureSource;
    private SaveFileDialog saveFileDialog = new SaveFileDialog() { Filter = "Audio files (*.wav)|*.wav" };

    public SimpleCommand RecordCommand { get { return _recordCommand; } }
    public SimpleCommand PlayPauseCommand { get { return _playPauseCommand; } }
    public SimpleCommand SaveCommand { get { return _saveCommand; } }

    public static readonly DependencyProperty StatusTextProperty = DependencyProperty.Register("StatusText", typeof(string), typeof(RecorderViewModel), null);
    public string StatusText
    {
        get
        {
            return (string)GetValue(StatusTextProperty);
        }
        set
        {
            SetValue(StatusTextProperty, value);
        }
    }
The constructor initializes the three commands to just call their respective methods on the class:
    public RecorderViewModel()
    {
        _recordCommand = new SimpleCommand()
        {
            MayBeExecuted = true,
            ExecuteAction = () => Record()
        };

        _saveCommand = new SimpleCommand()
        {
            MayBeExecuted = false,
            ExecuteAction = () => SaveFile()
        };

        _playPauseCommand = new SimpleCommand()
        {
            MayBeExecuted = false,
            ExecuteAction = () => PlayOrPause()
        };

        var audioDevice = CaptureDeviceConfiguration.GetDefaultAudioCaptureDevice();
        _captureSource = new CaptureSource() { AudioCaptureDevice = audioDevice };

        GoToStartState();
    }
The last piece is to define the methods doing the hard work:
    protected void Record()
    {
        if (!EnsureAudioAccess())
            return;

        if (_captureSource.State != CaptureState.Stopped)
            return;

        _sink = new MemoryAudioSink();
        _sink.CaptureSource = _captureSource;
        _captureSource.Start();

        // Enable pause command, disable record command
        _playPauseCommand.MayBeExecuted = true;
        _recordCommand.MayBeExecuted = false;
        StatusText = "Recording...";
    }

    protected void PlayOrPause()
    {
        if (_captureSource.State == CaptureState.Started)
        {
            _captureSource.Stop();

            // Disable pause command, enable save command
            _playPauseCommand.MayBeExecuted = false;
            _saveCommand.MayBeExecuted = true;
            StatusText = "Recording finished. You may save your record.";
        }
    }

    protected void SaveFile()
    {
        if (saveFileDialog.ShowDialog() == false)
        {
            return;
        }

        StatusText = "Saving...";

        Stream stream = saveFileDialog.OpenFile();

        WavManager.SavePcmToWav(_sink.BackingStream, stream, _sink.CurrentFormat);

        stream.Close();

        MessageBox.Show("Your record is saved.");

        GoToStartState();
    }
Putting it all together
I put three buttons and one textblock into the default MainPage.xaml:
<Button Command="{Binding RecordCommand}" Grid.Column="0" HorizontalAlignment="Left" Name="button1" Template="{StaticResource RecordCommandStyle}"/>
<Button Content="Stop" Command="{Binding PlayPauseCommand}" Grid.Column="1" HorizontalAlignment="Left"  Name="button3" Width="75" Template="{StaticResource StopCommandStyle}"/>
<Button Content="Save" Command="{Binding SaveCommand}" Grid.Column="2" HorizontalAlignment="Left" Name="button2" Width="57" Margin="0,0,0,-1" Template="{StaticResource SaveCommandStyle}"/>
<TextBlock Text="{Binding StatusText}" Name="textBlock1" Margin="8,5,-32,8" Grid.Row="1" Grid.ColumnSpan="4" Foreground="#FF13E3BC" FontSize="12" />
Note the bindings to the Command properties of the buttons and Text property of the textblock element (but this is nothing special). The whole viewmodel is then set to the page’s DataContext which is the only thing we do inside the code-behind:
RecorderViewModel ViewModel;

public MainPage()
{
    InitializeComponent();

    ViewModel = new RecorderViewModel();

    DataContext = ViewModel;
}
That’s it. I didn’t show changing the appearance of the standard button controls using visual states here because this possibility has been with us long before the fourth version but it’s included in the project.
The floppy disk icon comes from the wonderful Crystal project.
Download full sources of the sample.

[digg]